It has been three years since Microsoft launched its largest and most recent operating system. Being promoted as the best option, Windows 10 was not the best in terms of user expectations. Actually, it is far from that. Indisputed by blunt updates, slow start-up issues, slow restart errors, Windows 10 did not have the best start Redmond expected to have.
Table of Contents
How to speed up Windows 10 Slow Startup?
Microsoft’s Windows 10 has been improving since then at a rapid pace, but some problems such as the slow start and the slow restart problem have persisted even with the new Windows 10 updates. Here, we seek to provide the best advice we can find to solve the slow start of Windows 10. So, let’s start:
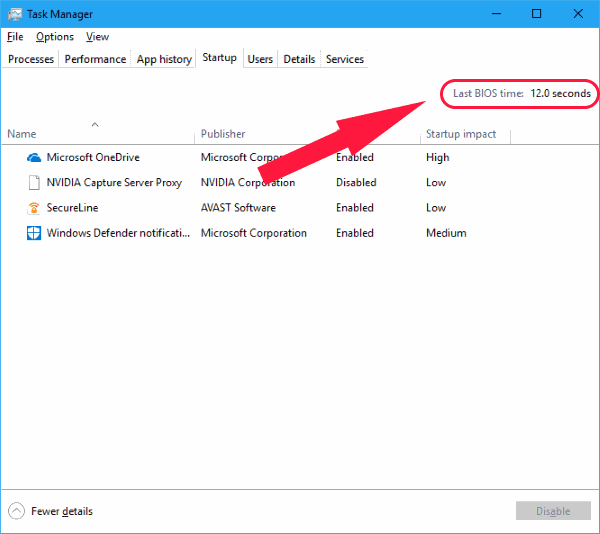
Check the time of Last Bios
The first thing you should check is your Last Bios Time. Basically, this is the time it takes the UEFI firmware to initialize your hardware before Windows 10 starts booting. Usually, this would only take a few seconds.
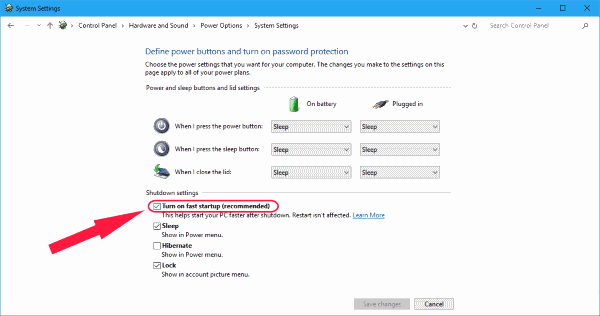
Disable Windows 10 Quick Start
The quick start function in Windows 10 is the most commented feature for all the wrong reasons. Since Windows 10 first appeared, the fast-start feature has caused so many problems and many users reported that slow starts and slow restarts are among them. Make sure that this is the first solution you try when Windows starts slowly.
To do this:
- Open the Control Panel and select Power Options.
- Click Choose what the power buttons do.
- Now click on Change settings that are currently unavailable.
- In Shutdown Settings, it disables the fast startup.
Note: Try disabling and enabling fast startup in Windows 10 while restarting after each change to see if the fast boot function is the problem.
Disables automatic maintenance of Windows 10
This slow start fix in Windows 10 may be unfamiliar for most users. The reason why this has not been widely reported is a problem. But for users facing slow turning points when restarting or starting Windows 10, this might be the solution they may be looking for. Automatic maintenance in Windows 10 generates problems that cause the dreaded turning points for years. This is especially true for PCs and laptops with dual graphics cards.
If you want to try this peculiar patch:
- Start the registry editor by typing regedit in the search box or Run.
- Navigate to the following key: HKEY_LOCAL_MACHINE\SOFTWARE\Microsoft\ Windows NT\CurrentVersion\Schedule\Maintenance
- In the right panel, there will be a 32-bit DWORD value named MaintenanceDisabled. In case there is no such value, create it yourself by right-clicking on the blank space in the right panel, then New> DWORD Value (32 bits).
- Keep in mind that, regardless of your CPU architect, a 32-bit keyword is still required.
- Now double click on the key to see its value. Set the value to 1 to disable automatic maintenance in Windows 10.
That’s it, and its Automatic Maintenance in Windows 10 is now disabled.
However, if this solution does not work for you or if you want to re-enable it, simply delete the key or set the value to 0.
Disables startup services and startup programs
Windows 10 handles startup programs and others in the same way as the previous ones (Windows 8 and Windows 8.1). If you want to see your startup services and startup applications:
- Start the Task Manager by right-clicking on the Start menu and selecting Task Manager or using the shortcut Ctrl + Alt + Delete.
- Go to Start-up and select the programs that monopolize the performance and disable them.
Now for services:
- Click on the start menu and select Run or press the Windows + R key.
- This will open the Run window and from here, type msconfig.
- In the next System Configuration window, go to the Services tab.
- Now you can choose the ones that are essential and the services that you do not need to start with the operating system.
- Keep in mind that you must hide all Microsoft services to be sure. Microsoft services can be essential, try to disable other services to solve the problem.
Disable Windows 10 services
This should not come as a surprise since most people would recommend disabling some of their local services to fix slow start problems and Windows 10 startups. But be careful because the first thing you should know when doing this is that some services are critical for your programs. Disabling some essential services of the new Windows 10 and the latest update versions can damage the system.
To get better references, we can give you the usual culprits for this Windows problem. Try to disable BITS (Intelligence Transfer Service in second plane) User connected and telemetry, Windows search. To do these actions mentioned,
- Go to Services by entering the services.msc command in Run.
- Locate each of these mentioned services.
- Right click on each of them and select properties.
- Click Stop and change the startup type to Off.
Also, you may have found a service called Superfetch. Most online advice suggests that Superfetch and Prefetch services be disabled to make Windows 10 faster. But, in fact, this can be counterproductive, especially if you have something better than 2 GB of Ram.
Superfetch in Windows has been the service that helps you efficiently pre-load the programs you use frequently. Also, get the best out of your machine’s capabilities by using your free and available RAM in the best possible way. Do not let the occasional peaks of the task manager fool you and make you believe that disabling the Superfetch service will make Windows 10 work magically faster. Also, you did not buy all that RAM capacity just to be there without doing anything.
Update graphics drivers
For some PCs and laptops that run on dual graphics (Intel HD Graphics along with dedicated AMD and Nvidia cards), switching between them can cause problems like black screens for a long time. Apparently, there are a couple of solutions you can try depending on whether you are using an AMD or Nvidia graphics card.
For Nvidia users, we suggest updating your graphics drivers to the latest version. You can do it from the Nvidia control panel. Also, install the latest version of the Nvidia driver by going to the official driver download page. Use the official tool to find your graphic card or manually select the model.
For AMD users, in addition to installing the latest version, there is another step you can look at. First, AMD graphics drivers have something called ULPS that works by automatically disabling the secondary GPU when it is not in use. Although it seems to be fine, you may have errors. As a result, this could cause slow startup problems.
To disable ULPS:
- Start the registry editor.
- Find the key called EnableULPS using the Search tool.
- Change the value of the key to 0.
The ULPS function is now disabled. Windows 10 updates have the habit of resetting this feature to enabled. Also, if something like this happens, be sure to deactivate it one more time.
Install the latest Windows 10 updates
Another obvious solution you should try to try is to update your Windows 10 with the latest updates. This could include important driver updates and cumulative updates. To check for updates:
- Go to Settings> Updates and security.
- Click on Check for updates.
Windows will now search for updates and install them automatically.
In addition, problems may also arise during the update process when the update files are corrupted and accumulate. So, the best thing you could do is start over and save some storage space in the process.
With all this, before you begin to lose your head or hit your PC until it has started, be sure to check these recommended corrections for your machine. We hope our solutions will be of some help to you. As always, tell us if it has been useful and if we have left something aside do not hesitate to comment below.